Battery switch on travel trailer function is crucial for safe and efficient power management. This guide will walk you through understanding how these switches work, the different types available, and how to properly connect and disconnect your batteries. We’ll cover troubleshooting common issues, integrating the switch with other power systems, and emphasizing essential safety precautions. Get ready to become a battery switch pro!
From single to dual switches, we’ll explore the pros and cons of each, providing a clear comparison to help you choose the best option for your travel trailer. We’ll also delve into the safety aspects of working with RV batteries, providing practical tips and best practices to keep you and your rig safe. Maintaining your battery connections is vital, so we’ll show you how to prevent corrosion and ensure a long battery lifespan.
Understanding Battery Switch Functionality in Travel Trailers
A battery switch is a crucial component in a travel trailer’s electrical system, allowing you to manage power from your trailer’s batteries and connect to shore power effectively. Understanding how it works is essential for safe and efficient use of your RV.
Battery Switch Types and Purposes
The primary purpose of a battery switch is to control the flow of electricity from your trailer batteries to the various 12-volt systems onboard. This allows you to disconnect your house batteries from the trailer’s systems to prevent draining when not in use, or to select between different battery banks. There are several types, each offering different levels of control.
Common types include single battery switches, dual battery switches, and selector switches. A single switch simply connects or disconnects one battery bank. Dual switches manage two battery banks separately, while selector switches offer more complex control, often allowing you to connect either battery bank, both simultaneously, or neither.
Operating a Typical Battery Switch
Most battery switches are relatively straightforward to operate. However, always consult your owner’s manual for specific instructions. A typical dual battery switch, for instance, might have three positions: “Off,” “Battery 1,” and “Battery 2.” To use only the first battery, you’d select “Battery 1.” To use only the second, select “Battery 2.” Some switches will have an additional “Both” position, allowing you to use both batteries simultaneously.
Before switching, always ensure that no significant loads (like a refrigerator compressor) are running to prevent arcing or damage. Turning the switch slowly and steadily minimizes the risk of sparks.
Comparison of Battery Switch Types
| Switch Type | Advantages | Disadvantages | Best Use Case |
|---|---|---|---|
| Single Battery Switch | Simple, inexpensive, easy to install. | Limited control, only one battery bank. | Travel trailers with only one house battery. |
| Dual Battery Switch | Allows separate control of two battery banks; useful for extending run time. | More complex than a single switch; slightly more expensive. | Travel trailers with two house batteries, for managing power efficiently. |
| Selector Switch (with “Both” option) | Offers greatest flexibility; allows use of either battery, both, or neither. | More complex installation; most expensive option. | Travel trailers with high power demands or those using a combination of deep cycle and starting batteries. |
Connecting and Disconnecting Batteries: Battery Switch On Travel Trailer Function

Connecting and disconnecting your travel trailer’s batteries might seem daunting, but with the right approach and safety precautions, it’s a straightforward process. This section will guide you through the steps, emphasizing safety and best practices for maintaining your battery system.
Properly connecting and disconnecting your batteries is crucial for the safe and reliable operation of your travel trailer’s electrical system. Neglecting this can lead to damage to your equipment, or even a fire hazard. Always remember to prioritize safety!
So, you’re planning a trip? Awesome! First things first: get yourself sorted with travel insurance. Check out Aon travel insurance for some solid options; they’ve got various plans to suit different needs. And while you’re at it, don’t forget the finer things – if you’re an audiophile, make sure to check out audiophile travel setup guides to ensure your tunes sound amazing on the road.
Planning ahead makes for a smoother, more enjoyable trip!
Battery Connection Procedure
Connecting your batteries involves carefully attaching the positive (+) and negative (-) terminals to the designated points in your travel trailer’s electrical system. Before beginning, ensure your battery switch is in the “OFF” position to prevent accidental short circuits. Clean any corrosion from the terminals using a wire brush or terminal cleaner. Then, securely attach the positive cable to the positive terminal, followed by the negative cable to the negative terminal.
Tighten the connections firmly, but avoid over-tightening, which can damage the terminals.
Safety Precautions When Working with RV Batteries
Working with RV batteries requires careful attention to safety. RV batteries contain corrosive acid and can produce explosive hydrogen gas. Always wear safety glasses to protect your eyes from splashes of acid, and wear gloves to protect your hands from corrosion and acid burns. Ensure adequate ventilation to prevent the buildup of explosive hydrogen gas. Never work near open flames or sparks while handling batteries.
If you smell a strong odor of rotten eggs (sulfur), it’s a sign of battery acid leaking, and you must stop work immediately and seek professional assistance.
Maintaining Battery Connections
Regular maintenance of your battery connections is essential to prevent corrosion and ensure optimal performance. Corrosion buildup on the terminals can impede current flow, leading to reduced battery life and potential electrical problems. Apply a battery terminal protector to prevent future corrosion. Periodically inspect the connections for any signs of corrosion or looseness. Clean the terminals with a wire brush or terminal cleaner and re-tighten the connections as needed.
Consider using anti-corrosion grease or a specialized battery terminal protector to minimize future corrosion.
Battery Connection and Disconnection Flowchart, Battery switch on travel trailer function
The following flowchart illustrates the steps involved in connecting and disconnecting batteries using a battery switch. This visual guide will help you understand the sequence of actions and ensure you follow the correct procedure.
Flowchart:
So, you’re planning a trip? Awesome! First things first: get yourself sorted with travel insurance. Check out Aon travel insurance for some solid options; peace of mind is key. Then, if you’re an audiophile like me, you’ll want to think about your audiophile travel setup. Proper planning means you can still enjoy your favorite tunes on the road, without sacrificing sound quality.
Don’t forget your chargers!
Step 1: Turn Battery Switch to “OFF” position.
Step 2: (Connecting) Clean battery terminals and cable ends.
Step 3: (Connecting) Connect positive (+) cable to positive (+) terminal, then negative (-) cable to negative (-) terminal. Tighten securely.
Step 4: (Connecting) Turn Battery Switch to “ON” position.
Step 5: (Disconnecting) Turn Battery Switch to “OFF” position.
Step 6: (Disconnecting) Disconnect negative (-) cable first, then positive (+) cable.
Step 7: (Optional) Apply battery terminal protector.
Battery Switch and Power Management Systems
Your battery switch is the heart of your travel trailer’s power distribution, but it doesn’t work in isolation. Understanding how it interacts with other systems is key to maximizing your power and avoiding problems. This section explores how your battery switch works with other components and explains different power management setups.
A battery switch acts as a central control point, directing power from your batteries to various parts of your trailer. It allows you to choose between using your house batteries, shore power, or a combination of both. This interaction with other systems is crucial for efficient power management.
Battery Switch Interaction with Other Components
The battery switch interacts with several key components in a typical travel trailer power system. For example, solar panels charge your batteries, and the switch allows you to use that stored energy. An inverter converts DC power from your batteries to AC power for appliances that require it, and the switch controls the flow of power to the inverter.
Without the switch, you’d lack the ability to select your power source.
Comparison of Power Management Systems
Travel trailers employ various power management systems, each with its strengths and weaknesses. A simple system might consist of a battery switch, a converter/charger, and an inverter. More advanced systems incorporate features like battery monitors, solar charge controllers, and automatic switching between power sources. These advanced systems often provide more detailed information about power usage and battery health, allowing for more efficient power management.
For example, a system with a battery monitor displays the state of charge of your batteries, enabling you to track your power consumption more effectively and preventing deep discharges. A system with a solar charge controller ensures your solar panels optimally charge your batteries without overcharging them, maximizing the solar power you harness.
Integrating a New Battery Switch
Installing a new battery switch usually involves disconnecting the existing switch and wiring the new one according to its instructions. This often requires working with DC wiring, so safety precautions are paramount. Properly identifying and disconnecting wires is essential, and it’s recommended to consult a qualified technician if you’re not comfortable with electrical work. Before connecting the new switch, ensure that all wiring is correctly identified and matches the new switch’s configuration.
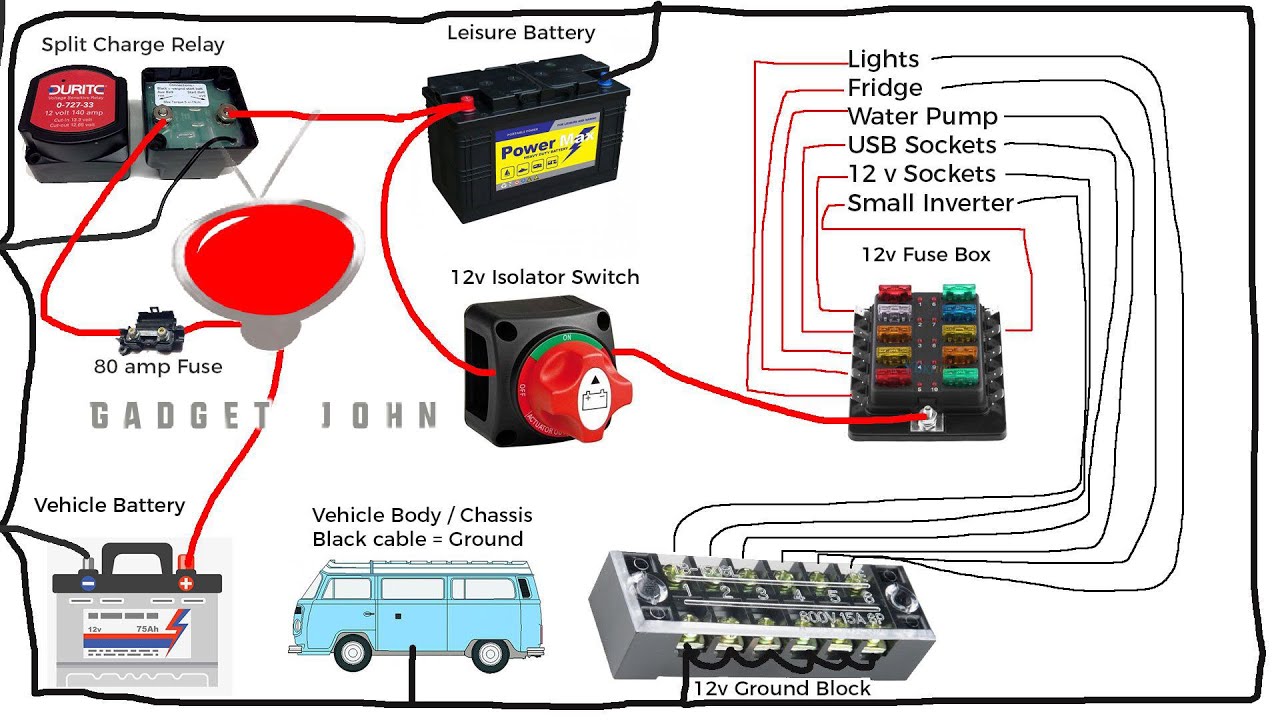
Typical Travel Trailer Power System Diagram
| Component | Description | Connection |
|---|---|---|
| Shore Power Inlet | Connects to campground electricity. | Converter/Charger |
| Converter/Charger | Converts shore power to DC and charges batteries. | Batteries, Battery Switch |
| Battery Switch | Selects power source (batteries, shore power). | Batteries, Inverter, 12V Appliances |
| Batteries | Store DC power. | Battery Switch, Converter/Charger, Solar Charge Controller |
| Solar Panels | Generate DC power from sunlight. | Solar Charge Controller |
| Solar Charge Controller | Regulates solar panel charging to batteries. | Solar Panels, Batteries |
| Inverter | Converts DC to AC power. | Battery Switch, AC Appliances |
| 12V Appliances | Operate directly on 12V DC power. | Battery Switch |
| AC Appliances | Operate on 120V AC power. | Inverter |
Types of Batteries Used in Travel Trailers
Choosing the right battery for your travel trailer is crucial for reliable power. Different battery types offer varying performance characteristics, impacting everything from your lights and appliances to the functionality of your battery switch. Understanding these differences will help you make an informed decision.
Two primary battery types dominate the RV market: lead-acid and lithium-ion. Each has its own set of advantages and disadvantages, and their impact on your battery switch differs significantly.
Lead-Acid Batteries
Lead-acid batteries are the traditional choice for RVs, known for their relatively low cost and wide availability. They come in flooded, gel-cell, and AGM (Absorbent Glass Mat) varieties. Flooded lead-acid batteries require regular maintenance, including checking and adding water. Gel-cell and AGM batteries are sealed and maintenance-free, but generally more expensive. In terms of the battery switch, lead-acid batteries, particularly flooded types, can generate more gas during charging, so proper ventilation is important.
A battery switch with appropriate surge protection is recommended.
Lithium-Ion Batteries
Lithium-ion batteries are a newer technology offering significant advantages over lead-acid. They boast higher energy density, meaning more power for the same size and weight. They also have a longer lifespan and charge faster. However, they are considerably more expensive than lead-acid batteries. Regarding the battery switch, lithium-ion batteries are less prone to gassing, and their sophisticated charging requirements may necessitate a more advanced battery management system (BMS) integrated with the switch to prevent overcharging and other potential issues.
Comparison of Battery Types
The following table summarizes the key specifications and characteristics of common RV battery types:
| Battery Type | Voltage (V) | Capacity (Ah) | Lifespan (cycles) |
|---|---|---|---|
| Flooded Lead-Acid | 12 | 100-200 | 300-500 |
| AGM Lead-Acid | 12 | 100-200 | 500-800 |
| Gel-Cell Lead-Acid | 12 | 100-200 | 400-600 |
| Lithium-Ion (LiFePO4) | 12 | 100-300+ | 2000-5000+ |
Mastering your travel trailer’s battery switch is key to a smooth and enjoyable RV experience. By understanding its function, properly connecting and disconnecting your batteries, and troubleshooting potential issues, you’ll be well-equipped to handle any power situation on the road. Remember safety is paramount; always prioritize safe handling practices when working with RV batteries. Happy travels!
FAQ Section
What size fuse should I use with my battery switch?
The appropriate fuse size depends on the amperage rating of your battery switch and the wiring. Check your switch’s specifications and consult an electrician if unsure.
Can I use a battery switch with lithium-ion batteries?
Yes, but you might need a specific type of switch designed for lithium batteries, as they have different voltage and charging characteristics. Check the compatibility before installation.
My battery switch is sparking. What should I do?
Immediately disconnect the battery and check for loose connections or damaged wiring. If the problem persists, consult a qualified RV technician.
How often should I inspect my battery switch and connections?
Regularly inspect your battery switch and connections, at least every few months or before each trip, checking for corrosion, loose connections, and any signs of damage.
